Here’s Dave Murray’s solo from a Maiden classic. I find most people miss the reckless quality of Dave’s playing in this one, so keep it loose, guys!
Category: Lessons
“Southern Star” solo & tutorial
One of my students brought this song in and I was delighted to find that it had a very short, simple solo that stayed primarily within the basic minor pentatonic shape. The little harmonized bending lick is a cool ditty to throw into any country solo, and this one (having it 4 times in a row) really helps to show how it relates to the chord.
“Only A Lad” solo & tutorial
Is it a solo? Is it an instrumental break?
Who cares?! Labels don’t change how it sounds, and it sounds awesome.
“Prisoners of the Damned” solo & tutorial
This song is badass. That’s all I can say. It’s just a killer tune with an epic video and a great solo. The bass break in the middle of the solo is one of my favorite things ever. As awesome as this song is, you would think Junior Romanelli would have written more songs for the band (this was his only one). It’s way different than most of the other Plasmatics stuff, but it shows that Wendy O. was perfectly suited to be a straight up metal vocalist.
“Mr. Blue Sky” solo & tutorial
I love this song. It just popped into my head a couple nights ago and I couldn’t go to sleep before I figured it out, so here’s the solo:
“You Give Love A Bad Name” solo & tutorial
I’ve got a few students working on this song right now, so the solo is fresh under my fingers. I had a short break in my day so I decided to do another quick lesson video.
“Rock Around the Clock” solo & tutorial
I was practicing for the Copycats gig this past Saturday and decided to make a quick video on how I play Danny Cedrone’s fantastic solo from “Rock Around the Clock”
Satriani’s Warmup
I won’t deny it, I stole this from a Joe Satriani video. It’s a tough video to find though, and it’s a great exercise, so I feel obligated to pass it along. I do this practically every day, especially before shows or any extended practice session. Apparently Satch does it every day too, so that’s enough reason for me to do the same. It does a great job of loosening up the muscles in your hand and getting you ready to play.
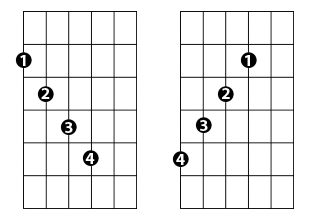
The whole thing is basically these two shapes:

Play those two shapes as written, it doesn’t matter what fret, but preferably a low one because you need somewhere to go. Next, move them up one string. Don’t worry about maintaining the intervals, just keep the shape. Now move up another string and do it again. Now you should be on the four top strings, so your next step is to move up a fret and do the shapes again. Now move down a string, do it again, down another string, do it again, up a fret, do it again…. you get the point.
It’s most helpful if you do this to a metronome, especially when you really start building up speed. But the important thing to pay attention to throughout is that every note is clear and you have no extraneous noises.
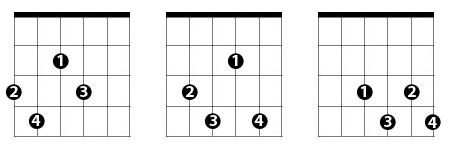
This next part is a simple little alteration to the last idea. This time, instead of moving that shape around, we’re going to use diminished 7th chords. I do this with drop 2 voicings, but you can do it with any type of chord that covers four adjacent strings. Here are the shapes I use:

Notice that they’re moving up in string sets just like we did in the last exercise. Do the same pattern of moving across the strings and up one fret as before. This one is a bit more challenging, but more applicable in real music situations. For example, if you had an A7 chord, you could do these three shapes on the 6th fret low E string (Bb), then the 7th fret A string (E), then the 8th fret D string (Bb again) and get a really cool b9 thing going during that chord.
Check out the video for some other ideas on how to alter this exercise to keep it fresh and challenging.
Spider Chord Changes
These are a couple of exercises that I came up with to work on fret hand coordination and finger independence. I got the term “Spider Chord” from Dave Mustaine. He has some exercises similar to this that he does, and utilizes these ideas to great effect in a lot of the Megadeth stuff, most notably the song “Wake Up Dead” (about a minute and a half in). Aside from being a great song, it’s a tour de force of metal rhythm techniques. Learning that will definitely give you an intense workout.
Anyways, spider changes… you’ll notice pretty quickly that your hand starts to resemble a spider when you do this, hence the name. First off is the more Mustaine-like exercise:

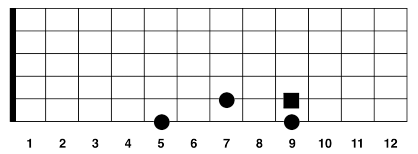
When you do this, it’s important that your fingers remain on the same frets throughout. That is: your index finger always plays the fifth fret notes, your middle finger always plays the sixth, your ring finger always plays the seventh, and your little finger always plays the eighth.
It’s pretty apparent that this wasn’t designed to be musical, but technical. However being able to do this cleanly will open up new possibilities for passages that you may not have thought of before. Mustaine says that he developed this technique when he was in Metallica, and he noticed a lot of songs had power chords on one string followed by a power chord one fret up and one string down (this exact thing). He says that Hetfield would change positions to play the new chord, but Dave didn’t like how this sounded (it’s a little slurred and not quite as crisp), so he started doing it this way. If you listen to the Megadeth stuff, you can tell that he pretty much ALWAYS does it this way now. Both ways are perfectly valid, they just sound different. Use the one that you feel suits the passage better. Mix it up and your playing will have lots more character and variety.
The next exercise is something that I got from the my old teacher Andrés Saborio (a fine classical guitarist and top-notch musician, you can check out his myspace page here). It’s a simple ascending chromatic scale, but the challenge is that you’re always playing octaves and never change position. There’s not much to say about this one, watch the video above to see how it works, then try it yourself by downloading the tab here.
Simple Sevenths
Been looking for a simple way to incorporate seventh chord arpeggios into your playing? Or maybe you’ve noticed that all your shapes start on the root and you’re looking to mix things up with some inversions? Well, this lesson has you covered. It’s a simple approach to seventh chord arpeggios using familiar, three-note-per-string modal shapes.
You’ve probably seen/used these shapes before, they look like this:

Note that we’re only using one shape for Ionian and Mixolydian, that’s because the only difference between the two is the 7th, and it doesn’t show up on the first two strings for these shapes.
What we’re going to do is make a formula for which notes in these shapes to play, and what sort of seventh chords those formulas create. We’ll number the notes, in ascending order, by number. So each voicing has six notes, numbered 1-6. The first formula is 1 – 3 – 5 – 6. So if we take the Ionian/Mixolydian shape, and start it at the 5th fret (A), we’ll be playing A C# E F#, which is an F#-7 (1st inversion).

Now take that same formula and try it with the Aeolian mode shape. Now you have A C E F… an FΔ7 (1st inversion). How about Locrian? A C Eb F… F7 (1st inversion). Now you’re probably noticing the pattern. 1 – 3 – 5 – 6 with these shapes will always give you some sort of 1st inversion 7th chord. How do you remember that? Well, if you’re familiar with figured bass, you’ll recognize that a 1st inversion 7th chord is indicated by 6/5. If you don’t know what figured bass means, you can read up on it here or you can just memorize this stuff. Whichever you prefer is fine (although understanding figured bass is probably the better way to go).
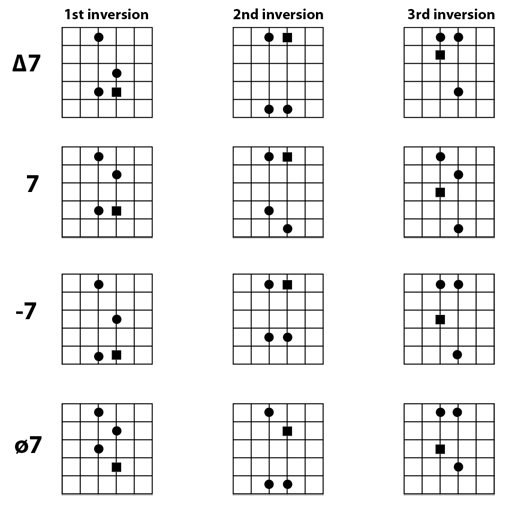
So what about 2nd and 3rd inversion arpeggios? Well, they’ve got simple formulas too. They are 1 – 3 – 4 – 6 for 2nd inversion (note that in figured bass this is indicated by 4/3), and 1 – 2 – 4 – 6 for 3rd (indicated in figured bass by 4/2). Here is a chart of all the inversions for each of the 4 types of 7th chords found in the major modes utilizing this approach:

What’s great about these shapes is that it’s really easy to move them up or down in octaves to create really cool extended arpeggios. A couple of my favorite shapes are the 1st and 3rd inversion dominant shapes. I like these ones because it’s really simple to move up or down a tritone each time I change a string. Dominant chords are just cool in general though… so there’s that.
I have not yet noticed any pattern for remembering which modes yield which arpeggios. Personally, I am able to look at the shape and identify which chords they are. I can also recognize them aurally. If you just remember which note is the root in each shape, you should be able to figure out what type of arpeggio you’re playing. Eventually, you’ll come to the point where you simply know.
