Superimposed Pentatonics


While “Superimposed Pentatonics” may sound fancy and technical, it’s actually a really simple concept that you can use to give your old, tired pentatonic licks a new flair. While this concept can be used with any of the 5 pentatonic shapes, we’re only going to look at the minor pentatonic (1 – b3 – 4 – 5 – b7). We’re sticking to this one because it’s the one that most people are comfortable using. Let’s start off with a lick:


MIDI

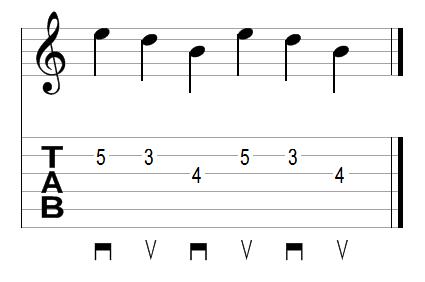
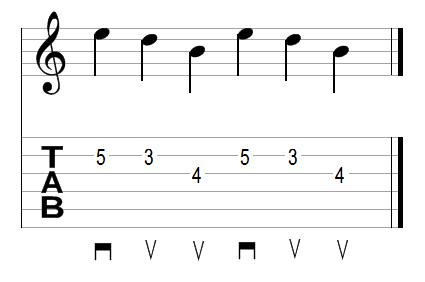
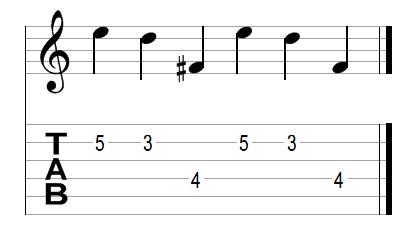
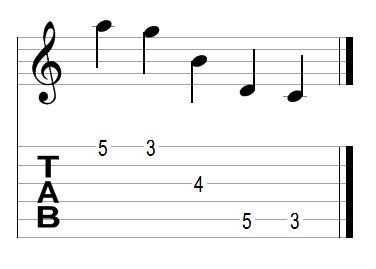
This is a typical minor pentatonic lick using the A minor pentatonic shape (start on the 5th fret). Play it over an A- chordMIDI and you’ve got a something you’ve probably heard before (and may even be bored of). So let’s mix it up a bit! Move that whole lick down 2 frets (a whole step). Play it again over the same A- chord.MIDI What happened? It was the same lick, same fingering, but it felt different. By moving the lick down a whole step, you changed each note’s relation to the chord, and ended up with something that clearly implies a Phrygian modality. Take a look at the diagram below and you’ll see how the notes in our minor pentatonic shape relate to the root of our A- chord.


Notice that we don’t play the root of the chord at all in the lick? This gives us a really interesting sound by eliminating players’ tendency to just lean on the root all the time.

So now you’re probably thinking “What happens if I play a whole step up? or a half step down? What happens if I move it up a whopping 7 frets?” Well I’ve already done all that work for you. I’ve mapped out the minor pentatonic shape in all possible relations to the root. Some of them are a little more difficult to utilize, and some of them sound great right away, requiring very little exploration before you find something cool about the sound. Here are my results, complete with where to start your minor pentatonic shape, what notes these are in relation to the root, what modes they could imply, and what chords you could play the shape over (it’s always okay to just play the triad instead of the 7th chord btw).

  • 2 frets up (whole step)
    • 2 – 4 – 5 – 6 – 1
    • Can be Ionian, Mixolydian, or Dorian
    • Play over A, A-, A7, practically anything
  • 4 frets up (major third)
    • 3 – 5 – 6 – 7 – 2
    • Can be Ionian or Lydian with no root
    • Play over AΔ7
  • 5 frets up (perfect fourth)
    • 4 – b6 – b7 – 1 – b3
    • Can be Phrygian, Aeolian, or Locrian
    • Play over A-7 or A-7(b5)
  • 7 frets up (perfect fifth)
    • 5 – b7 – 1 – 2 – 4
    • Can be Mixolydian, Dorian, or Aeolian
    • Play over A7 or A-7

  • 2 frets down (whole step)
    • b7 – b2 – b3 – 4 – b6
    • Can be Phrygian or Locrian with no root
    • Play over A-7 or A-7(b5)
  • 1 fret down (half step)
    • 7 – 2 – 3 – #4 – 6
    • Cleary implies Lydian with no root
    • Play over A<Δ7

You’ll notice that a couple of these leave few possibilities in regard to what mode they imply, while others leave things pretty vague. Use this to your advantage! You want to have a Dorian sound somewhere? Take a lick and play it in position then again a whole step up.MIDI BAM! You just hit every note in Dorian! Plus, you got a little sequence action in there… probably had a pretty cool lick to begin with… chances are, you’re starting to sound like somebody that knows what they’re doing, and not just some schmo throwing around minor pentatonic licks.

Of all these possibilities, my favorite is easily the last. Blazing through minor pentatonic licks while suggesting Lydian without ever hitting the root just sounds awesome. You are, of course, encouraged to try out the other pentatonic shapes. They will yield the same note relations, but the shape itself will influence what type of licks you play. For example, I find it really difficult to play really rocking licks using the major pentatonic shape… I always want to play more jazzy stuff with that shape. Whatever you do, try to stay creative, and if you’re ever at a loss for what to do in Phrygian, just drop down a whole step and tear it up!

Holdsworth Chord Exercise


This is a pretty simple exercise that is really good for stretching out your hands and developing your ability to get those really tricky chord voicings. The guitar is very unique in its abilities as a chordal instrument, and the further you can stretch and contort your fret hand, the more interesting chord voicings you can find.

Click here for pictures.

Place your fingers on the highest four strings, one finger per fret. Play this chord. Now switch strings with your middle and ring fingers. Play this chord. Now switch with your index and little fingers. Play the chord. Finally, switch your two inner fingers again and play the chord.

Now move the whole thing down a string set and repeat.

Do this again. Now go back up to the highest string set and put a single fret stretch between your index and middle finger. Repeat the whole process of switching strings and string sets.

Go back and add another single fret space, this time between your ring and little fingers. Next you will add a space between your middle and ring fingers, so there is a space between all of them. Finally, if you think you can do it, add another space between your index and middle fingers. If you want to get really brave, keep going until you’ve got a diminished 7th chord on a single string!

Start out on higher frets, like 12. As your hand stretches you can move it down to make it harder. Right now I can do it at the 7th fret with a 2-fret gap between my index and middle finger, and a single space between the rest, and I don’t have the long slender hands most people think you need to make those stretches. Just keep at it!

Strumming


So… strumming. I know, it seems like a super basic thing, but I do field a lot of questions about it. So many that I decided it would be easier to just write up a lesson on it. In this lesson I will cover the basic technique, some rudimentary stuff about rhythm and counting, a few common strum patterns, and a simple method for figuring out a nice rhythm to strum when you’re reading those chord charts you find on Ultimate-Guitar and other sites.

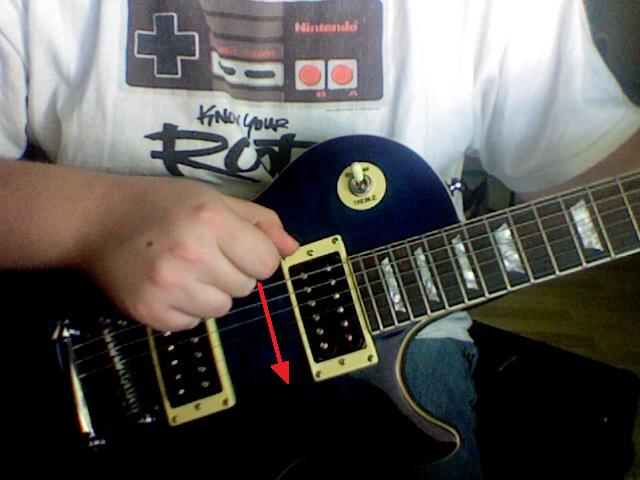
Strumming is very simple. All you do is move your pick (or fingers) straight across the strings. The movement is primarily in the wrist. A lot of people strum by locking their wrist and then bending their arm at the elbow. I’ve got two problems with this method. A) You get tired quickly, and B) It doesn’t sound as good. When you strum like that, you end up hitting the higher strings a lot closer to the bridge than the lower strings. Try picking a single string right over the sound hole (or about where it would be if electric guitars had sound holes). It produces a very full and pleasant tone. Now hit that same string really close to the bridge. It doesn’t sound as nice, does it? It’s kind of thin and weak, even a little bit harsh. It can be a very useful sound in certain circumstances, but it just doesn’t sound that good when you’re strumming. Take your time and practice strumming straight across the strings, as illustrated below.

As I said earlier, it’s all in the wrist. It may feel a little awkward at first, but it won’t take long before this motion comes naturally. Trust me on this one. Not only will you get a better sound, but you won’t tire your arm out either.

Now it’s time to start learning some rhythm! I’m not going to get into too much detail about rhythm and rhythmic notation here, just some basic stuff about counting. Most popular music is in 4/4 time. What that means is that the music is divided up into groups of 4 beats, and each quarter note lasts for one beat. You don’t need to know what a quarter note is, just know that we are going to be working with 4 beat rhythms. Grab your metronome (if you don’t have one, go get one, or just use this online one) set it to a nice slow tempo. Something around 70 beats per minute (bpm) should be fine. Now strum downstrokes across the strings each time the metronome clicks. Count “1, 2, 3, 4, 1, 2, 3, 4…” as you strum, one number per click.

Once you’ve got that down, start adding an upstroke between the downstrokes. Say the word “And” whenever you do an upstroke, so your counting will go “1 & 2 & 3 & 4 & 1 & 2 &…” Try to stick those upstrokes right in the middle of the two downstrokes. If you are having trouble keeping the rhythm steady, start alternating down and upstrokes for each click of the metronome.

So we’ve already got two really simple strum patterns down. We have ↓ – ↓ – ↓ – ↓ – and ↓ ↑ ↓ ↑ ↓ ↑ ↓ ↑. We’re just going to start dropping out some random notes from that second one. I’m just going to list a whole bunch of patterns to try. Remember to do these with a metronome and count aloud as you play.

  • ↓ – ↓ ↑ ↓ ↑ ↓ ↑ :: counted 1 – 2 & 3 & 4 &
  • ↓ – ↓ – ↓ ↑ ↓ ↑ :: counted 1 – 2 – 3 & 4 &
  • ↓ ↑ ↓ – ↑ ↓ ↑ :: counted 1 & 2 & – & 4 &
  • ↓ ↑ ↓ ↑ – ↑ – ↑ :: counted 1 & 2 & – & – &
  • ↓ – ↓ ↑ – ↑ ↓ ↑ :: counted 1 – 2 & – & 4 &
  • ↓ – – ↑ ↓ – ↓ :: counted 1 – – & 3 – 4 –

That second to last one is VERY common. It also tends to be a bit of a challenge for beginners. Once you get that one down, you’re probably ready to start tackling some songs, however I want you to take a look at that last one first.

That last one isn’t a really common rhythm, but it’s very good for developing your own rhythmic sensibilities. The trick here is to always keep your hand moving up and down with the beat. Do not stop and wait for the upstroke on 2&. If you stop and wait, then your timing won’t be as tight and the rhythm won’t flow properly. It will sound awkward and disjointed. Watch the video to see exactly what I mean. This sort of thing can be very challenging at first, but it IS the better way to do it. If you don’t do it right now, then you are going to have poor rhythm forever (or at least until you stop doing it wrong and fix your technique, which will be much more difficult than just doing it correctly in the first place).

Now we’re all set to play some songs, and I’m sure you’re wondering how to figure out the strum patterns for all those chord charts you’re pulling up on Chordie.com or wherever you like to go. Well, I hate to break it to you, but it usually doesn’t work that way. Strum patterns are primarily a teaching tool. They are designed to help you develop your sense of rhythm and timing; they aren’t a compositional tool. People don’t write songs thinking “Okay, I’m going to use this strum pattern for this part, then this strum pattern for this part…” No, that’s ridiculous. The song is all about the melody, the chords are just there to dress it up. They are like the backdrop in a portrait. Throwing a different rhythm under there won’t prevent somebody from recognizing the song; it will just give it a different feel.

So here is a simple little process you can go through to get the feel for a song, and hopefully figure out your own rhythms to strum those chords to. Start off by simply singing the song and playing the chords wherever you think they are supposed to go. It doesn’t matter if you’re a good singer or not, just sing and play. This will get you familiar with how the chords change throughout the song, and hopefully give you some idea about how they relate to the melody. The next step is to just play quarter notes (our ↓ – ↓ – ↓ – ↓ – rhythm). Keep singing and count the number of strums each chord gets (it will usually be 2, 4, or 8). This will help you spot any chords that change in odd places, like on the upbeats.

Once you’ve done that, you should have a pretty good feel for the song. You shouldn’t have any problem just playing what comes naturally while you sing now. Whether these rhythms are consistent patterns or change around a bit shouldn’t matter, you will be more in touch with the song and it will FEEL better. You can also try mixing things up a little bit and playing the song in a different style than the original performer! Check out the video and watch how I do this with “A Little Help From My Friends”.

LucasMan’s Ultimate Pick Exercise

So I know that sounds cocky, but since I developed this exercise, it really is the ONLY thing I do to develop my picking. It’s just a very versatile exercise that you can make simple alterations to in order to focus on different picking styles.

We’re going to start with alternate picking. Alternate picking is when you ALWAYS pick down-up-down-up-down-up… We will be using a simple 3-note figure that goes across two strings. The thing that makes this tricky is that you are alternate picking an odd number of notes, which results in your pick direction for each note switching every time you repeat the figure.

Play that 4x, then start moving it up one fret at a time until you reach the 12th fret. Once you get up there, play it 4x, then start moving back down. Make sure that you are emphasizing the down BEATS, not just the down STROKES. Do it with a metronome too! (those things are very important)

Now we’re going to turn it into an economy picking exercise! Economy picking means that whenever you move to a lower string, the first note you pick will be an upstroke, and whenever you move to a higher string, the first note you pick will be a downstroke. Sweep picking is a an application of economy picking. When we play the same figure above with an economy picking style, we will play it like this:

It feels a little different, but more importantly, it SOUNDS different. Try coming up with some other picking patterns. D-U-D is a good one, so is U-D-U; you could even try all upstrokes if you want.

Now we’re really going to start getting crazy! We’re going to incorporate some string skipping into this. Try playing this figure with all those different pick patterns you used on the previous one.

If you’re looking for an even greater challenge, we’ll up the ante and turn it into a 5-note pattern!

Yeah! That should get your brain all nice and befuzzled! But that’s the sort of thing that really helps develop your technique. You can toss practically any bizarre picking pattern (or rhythm) my way and I can do it without much trouble, and it’s all thanks to this exercise!

Lastly, I would like to talk about something I call “paraddidle picking”. A “paraddidle” is a basic drum rudiment where instead of alternating strikes with your left and right hand, you double up every third strike. This results in a R-L-R-R L-R-L-L pattern. I decided to try doing this with up and downstrokes, and it really is challenging (most of my Berklee teachers struggled to do this when I showed them, it really is THAT bizarre). All I do to practice this is pick a random note and trem pick it with this pattern: D-U-D-D-U-D-U-U. If you watch the video, you can see that I can do this pretty fast. It’s a great exercise and it has a unique sound to it as well. It’s just another way to play something… another color on your palette.

Notes On The Guitar

It seems that a lot of guitarists have trouble learning their notes. In fact, some seem to outright avoid it (and I can’t imagine why). It really isn’t that complicated. I taught it to my 10 year old brother in just a few minutes. There really is no valid reason to NOT learn them either, especially if you’re serious about being a musician.

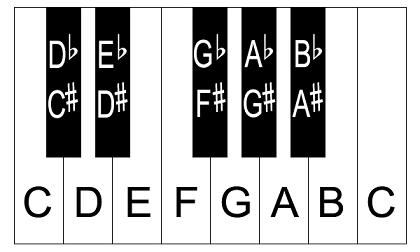
We’re going to start with a look at the keyboard (no, not that one in front of you, the piano keyboard). We’re doing this because, unlike the guitar, different notes actually look different on the keyboard.

So first we have the natural notes. These are the white keys on the keyboard. They are referred to by simple letter names that range from A to G and start back over from A again. Sometimes it is necessary (or just beneficial) to specify that you mean A Natural, C Natural, or any other natural note. When you need to do this, you can use this symbol: &#9838 (click here for a larger, more detailed image)

Between the natural notes are the sharps and flats. Sharps are indicated by this symbol: &#9839, while flats are indicated by this symbol: &#9837. The sharp notes are those immediately above (to the right of) a natural note, while flats are immediately below (to the left).

So the black key immediately above a C natural note is C&#9839. The note immediately below a D natural note is D&#9837. So you can see here that this one note has multiple names. When you have notes (or even chords or scales) that sound the same, but have different names, they are said to be “enharmonic”. So A&#9839 is enharmonic to B&#9837, D&#9839 is enharmonic to E&#9837, get it?

You might also notice that there are no black keys between B and C or E and F. Does that mean that there is no such thing as B&#9839? Or F&#9837? Well… yes and no. There are times when it’s appropriate to write those notes, but for right now, let’s just say that there is no such thing.

So you may have guessed by now that each key on the keyboard is equal to one fret on the guitar. If you play a C on the guitar, then move one fret up, it’s C&#9839! If you play an E note and move one fret down, it’s E&#9837!

If you watch the video you will see a couple of really simple exercises to help you really drill this stuff into your head. The reason I’m not including tabs or anything like that here is because if I did, you would just memorize them instead of figuring it out. If you’re going to actually get this stuff into your head, you need to figure it out every time. It DOES take time, so be patient. If you work on this stuff for just a few minutes a night, it will start to take hold and you won’t have to think about it that much. You’ll just know.

Intervals

Intervals are a VERY basic part of music, and anyone who calls themselves a musician should be able to recognize them. Whether or not they know the proper names for those intervals isn’t terribly important… recognizing them by sound is what matters. However, knowing their names IS a very handy thing, especially when you’re trying to communicate with other musicians via spoken or written word.

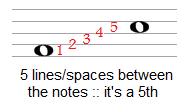
The name of an interval has two parts: the quality and the size. The size is the easy part. You can find it by simply counting the number of letters between two notes. C to D is a 2nd, A to E is a 5th, B to F is a 4th… it’s pretty simple. You can also count the number of lines/spaces between the two notes on a music staff, as shown in the following example:

The quality is the trickier part. The 5 main qualities for intervals are major, minor, perfect, diminished, and augmented. You can theoretically have things like double diminished or triple augmented, but the only place you’re ever going to see those is on your music theory tests. So which is which? The best way to figure all that out is to just learn all the intervals in the major scale, then compare everything to that.

We’re going to use the C major scale, which consists of the notes C D E F G A and B (all the naturals). C is the root, or 1 of the scale. D is the 2nd note. It is a major 2nd above C. E is the 3rd note. It’s a major 3rd above C (see the pattern?) Next is F, which is a perfect 4th abov– wait, perfect?! Yeah, so much for that pattern huh? Well, it’s still not complicated. The 4th, 5th, and octave are the only perfect intervals, everything else is a major interval.

So all together we’ve got the root, then a major 2nd, major 3rd, perfect 4th, perfect 5th, major 6th, major 7th, and a perfect octave.

Alright, but what about minor, diminished, and augmented? That’s simple too, but people often get confused here, so pay attention:

  • If a major or perfect interval is expanded by a half step, it becomes augmented
  • If a major interval is reduced by a half step, it becomes minor
  • If a minor or perfect interval is reduced by a half step, it becomes diminished

Keep in mind that by expand/reduce I mean adding sharps, flats, or natural signs to the EXISTING LETTERS. If you change the letter name of a note, you are changing the size (number) of the interval.

That’s practically everything you need to know! Let’s just do a couple of examples to make sure you’ve got it.

F to E♭… F G A B C D E… so it’s some type of 7th. The F major scale has a an E in it, so F to E is a major 7th. We’re going to E♭, so that’s one half step lower, which means it’s a minor 7th.

C♯ to A♭… C D E F G A… so it’s a 6th. C♯ major has an A♯ in it, so it’s not a major 6th. We’re going to A♭, which is 2 half-steps lower, so we’ve got a diminished 6th.

Is all this making sense?

Intervals can also be inverted! Let’s say you’ve got a major 6th interval going from A up to F♯. If you take that A note and move it up an octave, you’ve now got a minor 3rd interval! It’s easy to figure out the inversions. All you need to do is subtract the number of the interval from 9… that’s your new size. To figure out the quality, just remember these simple rules:

  • Major intervals become minor intervals and vice versa
  • Augmented intervals become diminished intervals and vice versa
  • Perfect intervals remain perfect

You may have realized by now that there are lots of intervals that sound the same… like a diminished 5th and augmented 4th, or a minor 7th and an augmented 6th. We call these “enharmonic intervals”. What’s the difference? Well.. it’s just technical. They sound the same. It’s really all about keeping the music organized and easy to understand.

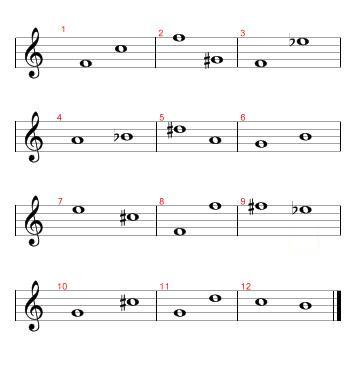
Now it’s time to put all this stuff to the test. Below is a little test. The answers are linked right below. I know this stuff may seem tedious right now, and it will most likely take you a little while to figure everything out, but it does get easier with time. Eventually you will simply know that E to G♯ is a major 3rd and A to D♭ is a diminished 4th.

Answers (opens in new window)
But shouldn’t we be able to recognize these intervals by ear? YES! Absolutely! I recommend Interval Trainer for Android devices. I’m sure there are plenty of great iOS and Windows device apps as well, but I haven’t tried them. You can also go to the “Downloads” section of the site, you can get a copy of a great ear training program called The Music Box. It’s shareware, so you don’t have to feel guilty about getting such a great program for free. It’s also pretty old, so I can’t guarantee that it will work on your machine. It’s also only available for Windows. If you only have Mac, then feel free to try out the stuff on this site. There’s also Auralia. It’s pretty much the grandaddy of ear training programs, but it’s rather pricey (especially considering the free alternatives).

Harmonics

Harmonics… a lot of people know how to do them, but not everyone knows exactly what they are, and if you really understand them, you can use them in way more creative and interesting ways. This article is going to take a slightly different approach to explaining them than the videos above do, but all the same stuff will be covered (with the exception of a few techniques for playing harmonics, which are just outright difficult to explain with words alone).

First off, what is a harmonic? When you pluck your guitar string, it goes up and down a certain number of times per second. This is the note’s “frequency”, which is measured in Hertz (Hz). I’m sure you’ve seen A=440Hz on your tuner or something like that before. That is our modern tuning standard, and it means that the A above Middle C (which you can play on the 5th fret of the high E string of your guitar) has a fundamental frequency of 440 Hertz.

What does “fundamental” mean? Well, no sound in nature has just one frequency. That’s called a sine wave, and you can only create those by use of synthesizers. Sounds consist of multiple frequencies interacting with each other, most of which are multiples of the fundamental (which is usually the lowest frequency). The fundamental and all the multiples of it are “harmonics”. The fundamental is the 1st harmonic, the next harmonic will have a frequency that is 2x the fundamental, the 3rd harmonic will be 3x the fundamental, etc etc. So the 2nd harmonic of A=440 would have a frequency of 880Hz, the 3rd harmonic would have a frequency of 1320Hz, and so forth.

So what notes are all those harmonics? That’s where a little something called the “Harmonic Series” comes in handy. The Wikipedia page I’ve linked there contains lots of great information, but the main thing to pull from it is the table under the “Harmonics and tuning” section. It tells you which intervals each harmonic equates to. The first 16 harmonics in the harmonic series are Do – Do – Sol – Do – Mi – Sol – Te – Do – Re – Mi – Fi – Sol – Le – Te – Ti – Do (or 1 – 1 – 5 – 1 – 3 – 5 – ♭7 – 1 – 2 – 3 – ♯4 – 5 – ♭6 – ♭7 – 7 – 1) all ascending. So the first harmonic (open string) is your fundamental, the 2nd harmonic is an octave above that, the 3rd harmonic is a perfect 5th above that, the 4th harmonic is a perfect 4th above that, etc. (if you do not understand what I mean by “perfect 5th” and “perfect 4th”, please refer to my lesson on intervals)

You may have noticed a pattern in the intervals there. Every time you double the number of a harmonic, that harmonic is an octave higher. For example, the 2nd, 4th, 8th, and 16th harmonics are all octaves of the fundamental (1st) harmonic. The 3rd, 6th, and 12th harmonics are all perfect 5ths, each one an octave higher than the last. This also means that each prime number harmonic gets you a new interval! (a prime number is a number that is only divisible by itself and 1. Here is a list of the first 1,000 prime numbers)

Okay, now we know what harmonics are, but how do we play them? The first type of harmonics we are going to play are called “natural harmonics”. To play these, you simply rest your finger on the string in certain spots. You don’t press the string down against the fret, you just lightly touch the string. The easiest spots to get these harmonics is right above the 12th, 7th, and 5th frets. The reason these are the easiest spots is because they are the lower harmonics (the 2nd, 3rd, and 4th ones specifically) and are a little bit more powerful. Higher harmonics are not as strong, and are therefore more difficult to hit, heavy distortion or compression makes it easier.

What you’re basically doing here is preventing the fundamental from ringing out while emphasizing a particular harmonic. Theoretically, the string is not moving at that spot where you are resting your finger. You are dividing the overall vibration of the string into several smaller waves. This diagram illustrates the idea well.

The vibrations in the string are being divided into whole number fractions of the fundamental, and those fractions are how you figure out where to put your finger to get each harmonic. If you want to hit the 2nd harmonic, you put your finger halfway between the nut and the bridge. If you want to hit the 3rd harmonic, you put your finger 1/3 of the way between the nut and the bridge. Get it?

Now we can move on to artificial harmonics. The only difference between artificial harmonics and natural harmonics is that where natural harmonics were played on an open string, artificial harmonics are played on a string where you are fretting a note. The same rules apply though, you merely have to touch the string 1/2, 1/3/, 1/4… between the fret and the bridge. The video shows several ways to play artificial harmonics, including “pinch harmonics” which are not a special type of harmonic, just another way of playing them.

So now you’ve got all the necessary information to know which notes all those harmonics are. You also know how to figure out exactly where that “sweet spot” is to hit them, which is where most harmonics tutorials really fall short. I know a lot of really talented players that make excellent use of harmonics, and many people want to learn how to do it from them, but the truth is: they don’t have a damned clue! They just fiddled around until they got it. Then they just kept doing it over and over until their hands just knew where to go. Personally, I’d rather not waste time blindly searching for that “musical G-spot” when I could use science to help me find it right away… it leaves me with more time to play music!

Chord Construction


I created the above videos before I did my lesson Notes On The Guitar, so while I talk about that stuff in the video, I won’t discuss it here. So, let’s start off by looking at the keyboard.

When you move just one note/key over (in either direction) it’s called a “half step”. When you move two notes/keys over it’s called a “whole step”. Take a moment to figure out the order of whole and half steps you get by going from C to C on the keyboard playing only the white notes.

Got it? W-W-H-W-W-W-H? Good! This combination of whole and half steps makes up the major scale. Since we started from a C note, we have a C major scale. If you go through that same combination of whole and half steps starting from a D note, or an E&#9837 note, or any other note, you will get a __ major scale! Try to figure out the notes in some other major scales. Remember, you never mix sharps and flats in a major scale, and you will always use all 7 letters in order. Some major scales may require double sharps or double flats, in which case it’s probably best to think of the scale as having a different root. For example, A♯ Major would have a B♯, C double sharp, E♯, Fdouble sharp, and G double sharp… that’s a little awkward. BUT, if you call it B♭ Major instead, then you just have B♭ and E♭, which is much easier to think about.

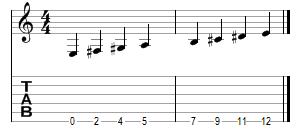
Okay, now we need to play some major scales on our guitar. You may have guessed that a half step is equal to one fret and a whole step is equal to two frets. Well, you guessed right! So let’s try to play an E major scale on the guitar, starting from the open low E string. It will go like this:

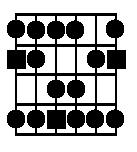
You can play those notes on different strings, which is how you come up with different scale shapes/fingerings. This next shape is particularly useful for figuring out different ways to play chords. It’s a position shape, which means you play it using one finger per fret and don’t move your hand (which is what makes it good for this purpose). Squares indicate the root notes.

Each note in the scale is also assigned a numerical value. The root note (the note from which we start our W-W-H-W-W-W-H pattern) is the 1. Next is the 2, then the 3, and so forth. All of this is covered in more detail in my intervals lesson.

So chords are basically different notes in a scale played simultaneously. Allan Holdsworth humorously compares this to a large family sitting at a table, then having certain members stand up to have their picture taken. “Steven, George, Sarah… Winston or whatever”. It seems silly, but it really is a great way to think about it. (you can watch the video here)

Instead of using names, we’re just going to use the numbers we came up with earlier! So if we play notes 1 3 and 5 of the major scale all at the same time, we get a major chord! In the E major scale we did earlier, we can see that notes 1 3 and 5 are E G♯ and B notes. That means that any combination of E G♯ and B notes is an E major chord!

Chord formulas can also include ♯ and ♭ numbers. For example, a minor chord is built 1 – ♭3 – 5, so we take our E – G♯ – B, but then flat the 3, giving us a G natural note. Now we’ve got E – G – B, which is our E minor chord. An augmented chord is built 1 – 3 – ♯5, which would give us E – G♯ – B♯ (this is one of those situations where it’s actually appropriate to call it B♯ instead of C)

Here is a chart that lists a whole bunch of different chord formulas. Study it. It shouldn’t take long before you start recognizing patterns in how the chords are named. The names aren’t arbitrary; they tell you exactly what notes are in the chord. I remember my very first guitar lesson… it was with a great player named Brad Bischoff. I walked in, played an open G major chord, and said “That’s G major. Tell me why.” He pulled out a chart very similar to the one I created up there and my whole world was illuminated. Having that sort of information helped me progress A LOT faster than my friends (who started playing guitar around the same time). Each week they would come home from their lessons bragging about learning a new chord. I’d just ask “What’s it called?” then figure it out myself. They never wanted to listen to me when I tried to explain to them that their teachers were wasting their time and money by not REALLY teaching them music. They gave the same ridiculous retort every time “We don’t use that theory crap. We don’t want to stifle our creativity.” It took years for them to realize how right I was (and how foolish they were), and how stifled their playing had been by their lack of understanding.

Capos And How To Use Them

(During the video I refer to the song “Hotel California”, please go here to view it)

I field a lot of questions about capos. Most of the time people are wondering what chords they are actually playing when using the capo, but there also seems to be a lot of general confusion about them. The above video and this lesson are intended to answer some common questions I get and dispel a few bizarre ideas that I’ve come across.

First off: what’s a capo? Well, basically it’s just a little clamp that holds down all the strings of your guitar at once. I recommend the Shubb brand capos. As far as I’m concerned, they are the best capos money can buy. I DO NOT recommend the spring type capos, like the popular Keyser and Dunlop models. The problem with those type of capos is that they rarely apply the proper amount of pressure to the strings, often pulling them sharp and out of tune (or simply not pressing them firmly against the frets in the first place). Many people prefer them because they are quicker and easier, but none of that really matters if everything you’re playing is out of tune. Besides, it only takes a few seconds to properly adjust a Shubb capo. It’s not a big deal. The Shubb will also last forever.

So what are they for? Capos allow you to utilize open strings in keys that you normally couldn’t. There are lots of great ways to use open strings on the guitar, from unique chord voicings, to pedal tones, to nifty licks. People primarily use capos to facilitate the usage of common open chord voicings (like the CAGED chords) in other keys.

In the video, I play the song “Hey Joe”, which uses all the basic CAGED shapes. Now let’s imagine that a singer walked in while you were playing that and asked to sing along, but he was having trouble singing it in that key. Perhaps if you moved everything up a little bit he would have less trouble. Well, capos make that sort of thing super easy! You stick the capo on there and now it’s in a new key.

But what key is it in now? How do you figure out what chords you’re actually playing? That’s pretty easy too. First off, putting the capo on a particular fret DOES NOT automatically put you in a certain key. The very idea of such a thing is utterly ridiculous. If that were true, then playing without the capo would mean you were always in E, or A, or some other arbitrary key, and that’s obviously not true.

All you need to do to figure out the new chords and what key you are in is count up the same number of half-steps as the fret you put the capo on. So if you put the capo on the 3rd fret, you would change the letter name of each chord by 3 half steps. For example, if the original chord was E, and you put a capo on the 3rd fret, it is now a G chord, as G is 3 half steps above E. If the original song was in A, it’s now in C.

(If you don’t know what a half step is, check out my lessons on intervals or chord construction)

A lot of people get confused here, and it’s mainly because they think about chords in a very backwards way. A chord doesn’t get its name from the fingering. A chord gets its name from the notes you are playing. So if you play a C chord like this: X-3-5-5-5-3 then move it up a few frets, it’s no longer a C chord, as you are playing different notes. Likewise, if you changed the tuning and still played that chord in the original place, it’s not a C chord.

That doesn’t mean that you can’t refer to those shapes as “the A minor shape” or “a D major shape”. Pretty much every guitarist on the planet knows those shapes and chords and will know exactly what you’re talking about. Just don’t make the mistake of thinking that the shape itself IS that chord.

Another thing that people often get confused about is how chords are labelled on charts for songs where the original performer used a capo. These charts are basically written in the key the song would be in WITHOUT the capo. Let’s say I wrote a song using the chords F C Am and Gm, but I played it with a capo on the 5th fret using the C G Em and Dm shapes. When I went to write a chart later, I would simply list the chords as C G Em and Dm, with a note that the player should have a capo on the 5th fret. The reason it’s done this way is mainly to get people playing the right thing sooner. If I were to tell somebody “Yeah, you need a capo on the 5th fret, then the chords are F C Am and Gm”, it might take them a minute or so to figure out how to play those chords with the capo on there. If I simply told them “Put a capo on the 5th fret then use the C G Em and Dm shapes” they would immediately know exactly what to do. Even really experienced and seasoned guitarists would respond to the second way faster.

It’s somewhat similar to the practice of transposition, which they do for instruments like the trumpet or the saxophone. It’s all intended to give the performer less to think about, allowing them to focus on the music and their performance. If one person is playing with a capo and the other person isn’t, that doesn’t mean they are playing different chords or in different keys. They are just playing those chords in different ways.